1. Vấn đề ban đầu
Bài toán đặt ra khá cụ thể: mỗi ngày, arXiv xuất bản thêm hàng nghìn bài báo mới với metadata và abstract trải dài trên nhiều lĩnh vực như cs.AI, cs.LG, stat.ML, math.OC. Mục tiêu là xây dựng một pipeline tự động, chạy định kỳ hằng đêm, có khả năng: gọi API của arXiv để lấy về các bài báo mới trong những category quan tâm, tiền xử lý văn bản (lọc nhiễu, chuẩn hóa, tách tập train/validation/test), huấn luyện mô hình phân loại để gán nhãn chủ đề chi tiết hơn, rồi lưu kết quả phân loại để đội nghiên cứu hoặc sản phẩm có thể tra cứu, lọc theo chủ đề và theo dõi xu hướng nghiên cứu theo thời gian. Về mặt thuật toán, đây chỉ là một bài toán text classification tiêu chuẩn; phần khó nằm ở chỗ hệ thống phải vận hành đều đặn theo ngày, dễ mở rộng, đồng thời có khả năng truy vết lại mọi lần huấn luyện và mọi phiên bản mô hình đã được triển khai.

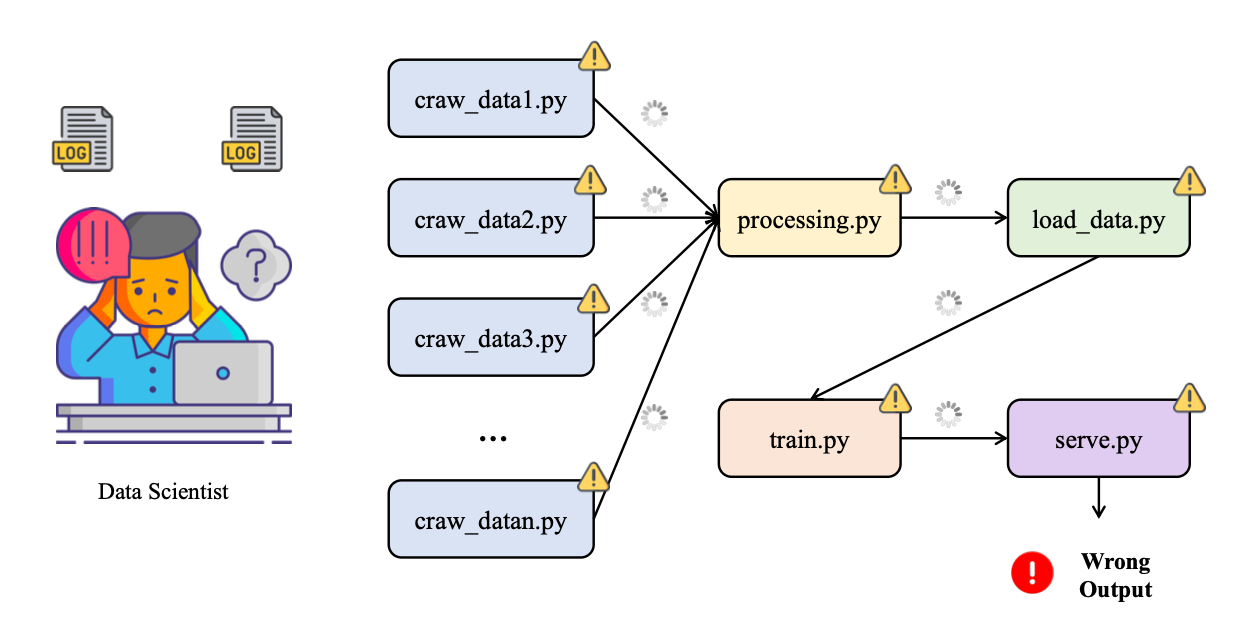
Ở giai đoạn đầu, toàn bộ pipeline phân loại arXiv thường được ghép từ nhiều mảnh vụn: một script riêng để crawl dữ liệu từ arXiv, một notebook để thử nghiệm và tiền xử lý dữ liệu, một script khác chỉ chuyên train model, rồi thêm một script “deploy thủ công” để copy model được cho là tốt nhất vào thư mục models/production. Toàn bộ luồng xử lý này được dán lại bằng Cron và một file run_all.sh chạy lần lượt từng bước. Nhìn qua thì có vẻ pipeline đã được “tự động hóa”, nhưng thực chất chỉ là một chuỗi lệnh nối tiếp không có khái niệm state, không có luồng kiểm soát rõ ràng, và gần như không có quan sát (observability).
Khi hệ thống bắt đầu chạy lâu ngày, các vấn đề lộ rõ: rất khó – gần như bất khả thi – để chạy lại pipeline tương ứng với dữ liệu của bảy ngày trước vì không còn nhớ chính xác ngày đó đã dùng bộ tham số nào, đã train trên snapshot dữ liệu nào, có thay đổi gì trong logic tiền xử lý hay không. Trong thư mục models/ thường tồn tại cùng lúc năm đến bảy file .pkl với tên kiểu model_final.pkl, model_final_v2.pkl, best_model.pkl, không có cơ chế nào khẳng định model nào đang chạy ngoài production, model nào chỉ là bản thử nghiệm bị bỏ dở, và cũng không có lý do rõ ràng tại sao một bản lại “tốt hơn” bản khác. Nếu Cron job chạy lúc ba giờ sáng bị lỗi tại bước tiền xử lý vì một trường dữ liệu mới xuất hiện trong API, sáng hôm sau dashboard sẽ trống trơn mà không có cảnh báo rõ ràng ngoài vài dòng log bị chôn sâu đâu đó trên server.
Từ trải nghiệm này, bài toán thực sự không còn là “làm sao để train một model phân loại arXiv tốt hơn” mà chuyển thành “làm sao để pipeline phân loại bài báo arXiv được tự động hóa end-to-end một cách có kiểm soát, làm sao để theo dõi có hệ thống mọi lần huấn luyện model, và làm sao để rollback về một phiên bản model an toàn nếu phát hiện model mới hoạt động tệ hơn model cũ”. Khi xem xét các lựa chọn, một hướng tiếp cận bền vững hơn xuất hiện: sử dụng Apache Airflow để điều phối toàn bộ pipeline (scheduling, dependency, retry, logging) và sử dụng MLflow để tracking, versioning và quản lý vòng đời mô hình từ lúc thử nghiệm cho đến khi đưa vào production.
Apache Airflow là gì?
Apache Airflow là một nền tảng mã nguồn mở dùng để xây dựng, lập lịch và giám sát các workflow dạng batch: chuỗi các bước xử lý dữ liệu, ETL/ELT, huấn luyện mô hình, sinh báo cáo… tất cả được định nghĩa bằng Python. Airflow được tạo ra ở Airbnb để giải quyết bài toán “script chồng script” khi số lượng job dữ liệu tăng lên và nhanh chóng trở thành một dự án Apache chính thức.
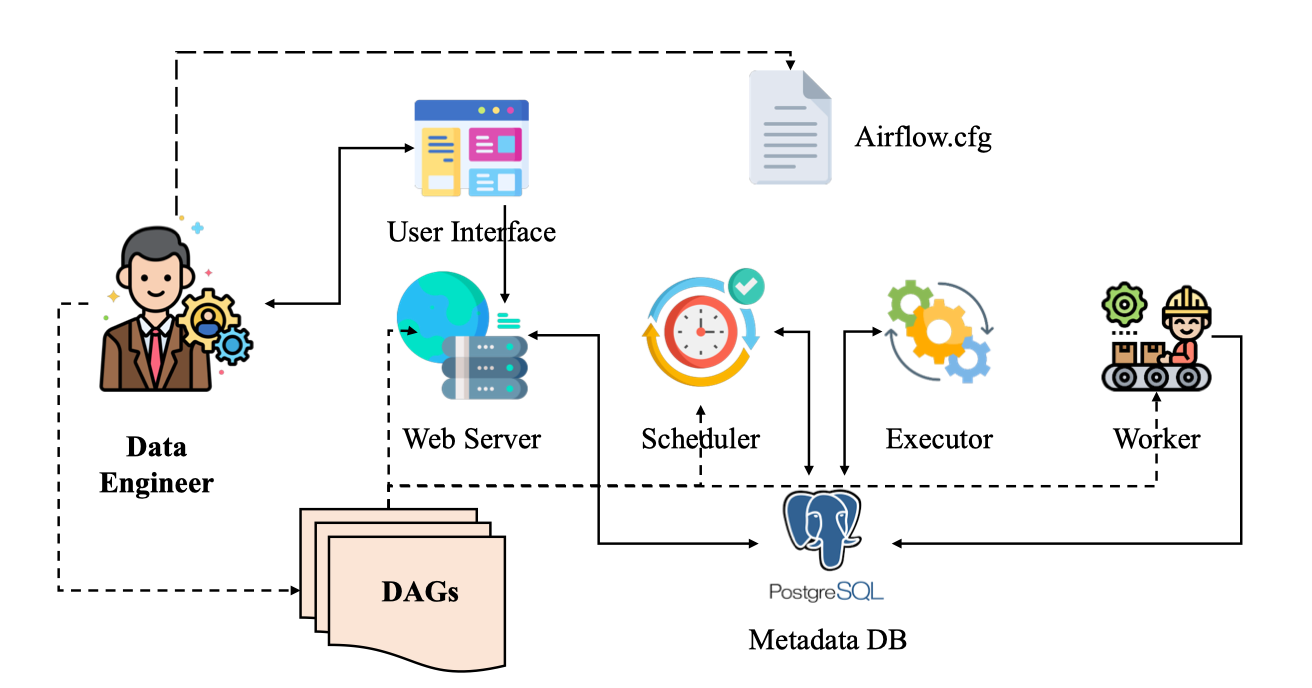
Điểm đặc trưng của Airflow là khái niệm DAG (Directed Acyclic Graph). Thay vì có một file shell dài gọi lần lượt step1.sh, step2.sh, step3.sh, mỗi bước trong pipeline được mô hình hóa thành một task; các task này nối với nhau thành một DAG mô tả thứ tự và quan hệ phụ thuộc. Scheduler của Airflow sẽ đọc DAG, quyết định khi nào chạy từng task, task nào có thể chạy song song, task nào phải đợi kết quả của task khác, và ghi lại trạng thái, log, lịch sử chạy để hiển thị trên web UI.
Kiến trúc của Airflow tách rõ các thành phần: webserver (UI), scheduler, worker, message broker và metadata database. Cách tổ chức này cho phép chạy từ môi trường rất nhỏ (một máy laptop, tất cả trong một process) cho đến cụm phân tán với nhiều worker xử lý hàng trăm DAG mỗi ngày. Pipelines được viết bằng Python nên có thể sinh động, cấu hình bằng code (workflow-as-code), dễ đưa vào hệ thống version control, code review, test tự động. Airflow không “làm thay” phần logic xử lý dữ liệu hay machine learning, mà đóng vai trò nhạc trưởng điều phối: quyết định khi nào chạy, chạy ở đâu, xử lý lỗi, retry, backfill, và cho đội vận hành cái nhìn tập trung về tất cả các job đang chạy trong hệ thống.
Trong bối cảnh pipeline phân loại bài báo arXiv, Airflow phù hợp để biểu diễn toàn bộ luồng: gọi API arXiv lấy dữ liệu, lưu raw data, làm sạch, tách tập train/validation/test, huấn luyện mô hình mới, đánh giá, và cuối cùng là bước ra quyết định có cập nhật model production hay không. Toàn bộ chuỗi đó trở thành một DAG rõ ràng thay cho nhiều cron job rời rạc, khó truy vết.
MLflow là gì?
MLflow là một nền tảng mã nguồn mở do Databricks phát triển, nhằm quản lý toàn bộ vòng đời của mô hình machine learning: từ giai đoạn thử nghiệm (experiment), huấn luyện, đóng gói, triển khai đến quản lý phiên bản model trong production. Mục tiêu chính của MLflow là giải quyết ba vấn đề kinh điển trong ML: khó tái lập kết quả, khó so sánh các lần experiment khác nhau và khó quản lý các phiên bản model khi đưa vào môi trường thực tế.
MLflow thường được hiểu thông qua bốn thành phần chính. MLflow Tracking cho phép log có cấu trúc tất cả thông tin của một lần train: tham số (params), chỉ số đánh giá (metrics), file sinh ra (artifacts) như model, hình ảnh, log chi tiết; tất cả được lưu trong một backend (file, database, object storage) và truy cập qua UI hoặc API. MLflow Projects đề xuất một chuẩn đóng gói code và môi trường thực thi để giúp chạy lại cùng một experiment trên môi trường khác dễ dàng hơn. MLflow Models định nghĩa cách đóng gói model theo một format chung, sao cho có thể deploy sang nhiều nền tảng phục vụ inference. Cuối cùng, MLflow Model Registry cung cấp kho lưu trữ model tập trung, hỗ trợ versioning, gán stage (Staging, Production, Archived), thêm mô tả, tag và lịch sử chuyển stage cho từng phiên bản.
Trong bài toán phân loại arXiv, MLflow đóng vai trò bộ nhớ trung tâm của toàn bộ quá trình huấn luyện: mỗi lần pipeline chạy là một loạt run được ghi lại, bao gồm hyperparameter (ví dụ: số feature TF-IDF, C của Logistic Regression), metric (F1-macro, accuracy), artifact (model, confusion matrix, vectorizer). Từ đó có thể dễ dàng trả lời những câu hỏi mà cách làm thủ công rất khó giải: model đang chạy production được train với tham số nào, trên snapshot dữ liệu ngày nào, có phiên bản nào từng tốt hơn nhưng đang bị “bỏ quên”, hay khi nào nên rollback về phiên bản cũ. Model Registry của MLflow còn cho phép thiết lập quy trình chuẩn: chỉ model đạt một ngưỡng F1 nhất định và được review mới được chuyển sang stage Production; mọi thay đổi đều được lưu dấu vết.
Vì sao Airflow và MLflow thường đi cùng nhau trong MLOps?
Airflow và MLflow giải quyết hai lớp vấn đề khác nhau nhưng bổ trợ mạnh cho nhau. Airflow chịu trách nhiệm orchestration: điều phối từng bước dữ liệu và ML trong không gian và thời gian, quyết định thứ tự và thời điểm chạy, xử lý phụ thuộc, retry, backfill. MLflow chịu trách nhiệm tracking và model management: đảm bảo mọi lần train đều được ghi nhận, mọi model đều có phiên bản, có metadata rõ ràng và có nơi để quản lý vòng đời triển khai. Khi kết hợp hai công cụ này, pipeline phân loại arXiv không chỉ chạy tự động mỗi đêm, mà mỗi lần chạy đều để lại dấu vết đầy đủ; bất kỳ lỗi nào ở bất kỳ bước nào cũng có log và lịch sử rõ ràng, và việc nâng cấp hay rollback model trở thành một thao tác có quy trình, thay vì cố gắng nhớ xem file best_model_final_v3.pkl nằm ở đâu trong server.
2. Xây dựng project
Để không sa lầy vào cài đặt công cụ, phần dưới giả định môi trường đã có:
-
Python 3.10+
-
Đã
pip install(hoặc cài quaconda) các gói chính:
apache-airflow,mlflow,scikit-learn,datasets,sentence-transformers(nếu cần),numpy
Nếu chưa, chỉ cần chuẩn bị một virtualenv, cài đủ các gói trên rồi hãy nghĩ đến Airflow/MLflow.
1. Chuẩn bị cấu trúc dự án
Trước hết cần tách phần xử lý dữ liệu và huấn luyện khỏi notebook sang các module Python rõ ràng. Một cấu trúc đơn giản có thể là:
arxiv_topic_pipeline/
├── ml_project/
│   ├── __init__.py
│   ├── config.py
│   ├── data_pipeline.py
│   └── train_mlflow.py
├── dags/
│   └── arxiv_airflow_mlflow.py
├── mlruns/              # MLflow artifacts (tự sinh)
├── mlflow.db            # MLflow backend (SQLite, tự sinh)
└── requirements.txt
Ý tưởng chính: Airflow chỉ import các hàm trong ml_project, gọi theo đúng thứ tự; MLflow chỉ lo log mọi thứ bên trong các hàm training.
2. Module cấu hình: ml_project/config.py
File này gom các hằng số cấu hình để Airflow và code ML dùng chung, tránh việc hard-code lung tung:
# ml_project/config.py

from typing import List

# 5 primary categories như tài liệu arxiv-abstracts-large đã dùng
CATEGORIES_TO_SELECT: List[str] = ["astro-ph", "cond-mat", "cs", "math", "physics"]

MAX_SAMPLES: int = 1000
RANDOM_STATE: int = 42
TEST_SIZE: float = 0.2

# Thư mục cache dataset Hugging Face và dữ liệu preprocessed
CACHE_DIR: str = "./cache"
DATA_DIR: str = "./data"

# Tên experiment và model trong MLflow
MLFLOW_EXPERIMENT_NAME: str = "arxiv-topic-classification"
MLFLOW_MODEL_NAME: str = "arxiv_topic_classifier"
3. Module xử lý dữ liệu: ml_project/data_pipeline.py
Module này chuyển toàn bộ phần “load dataset → lọc 5 chủ đề → tiền xử lý → chia train/test → lưu ra file” vào một hàm duy nhất. Airflow chỉ cần gọi hàm đó.
# ml_project/data_pipeline.py

import json
import os
import re
from typing import Dict, List, Tuple

from datasets import load_dataset
from sklearn.model_selection import train_test_split

from .config import (
    CATEGORIES_TO_SELECT,
    MAX_SAMPLES,
    RANDOM_STATE,
    TEST_SIZE,
    CACHE_DIR,
    DATA_DIR,
)


def preprocess_text(text: str) -> str:
    """
    Chuẩn hóa abstract:
    - Bỏ xuống dòng và khoảng trắng dư
    - Bỏ ký tự đặc biệt, chữ số
    - Chuyển về lowercase
    """
    cleaned = text.strip().replace("\n", " ")
    cleaned = re.sub(r"[^\w\s]", " ", cleaned)
    cleaned = re.sub(r"\d+", " ", cleaned)
    cleaned = re.sub(r"\s+", " ", cleaned).strip()
    return cleaned.lower()


def load_raw_samples(max_samples: int = MAX_SAMPLES) -> List[Dict]:
    """
    Load dataset UniverseTBD/arxiv-abstracts-large, chọn các bài:
    - Có đúng 1 category
    - Thuộc một trong các primary categories được định nghĩa trong config
    """
    ds = load_dataset("UniverseTBD/arxiv-abstracts-large", cache_dir=CACHE_DIR)
    samples: List[Dict] = []

    for s in ds["train"]:
        categories_str = s["categories"]
        parts = categories_str.split(" ")
        if len(parts) != 1:
            continue

        primary = parts[0].split(".")[0]
        if primary not in CATEGORIES_TO_SELECT:
            continue

        samples.append({"abstract": s["abstract"], "label": primary})
        if len(samples) >= max_samples:
            break

    return samples


def build_label_maps(labels: List[str]) -> Tuple[Dict[str, int], Dict[int, str]]:
    """
    Xây mapping label <-> id: astro-ph -> 0, cond-mat -> 1, ...
    """
    unique_labels = sorted(set(labels))
    label_to_id = {label: i for i, label in enumerate(unique_labels)}
    id_to_label = {i: label for label, i in label_to_id.items()}
    return label_to_id, id_to_label


def prepare_dataset(
    output_dir: str = DATA_DIR,
    max_samples: int = MAX_SAMPLES,
) -> str:
    """
    Pipeline dữ liệu:
    - Load 1000 samples (hoặc max_samples) từ arxiv dataset
    - Tiền xử lý text
    - Mapping label -> id
    - Chia train/test
    - Lưu ra 1 file JSON duy nhất (dataset.json)
    Trả về path tới file dataset.json để Airflow/MLflow dùng.
    """
    os.makedirs(output_dir, exist_ok=True)

    raw_samples = load_raw_samples(max_samples=max_samples)

    texts: List[str] = []
    label_names: List[str] = []

    for s in raw_samples:
        texts.append(preprocess_text(s["abstract"]))
        label_names.append(s["label"])

    label_to_id, id_to_label = build_label_maps(label_names)
    y_full = [label_to_id[label] for label in label_names]

    X_train, X_test, y_train, y_test = train_test_split(
        texts,
        y_full,
        test_size=TEST_SIZE,
        random_state=RANDOM_STATE,
        stratify=y_full,
    )

    dataset = {
        "X_train": X_train,
        "y_train": y_train,
        "X_test": X_test,
        "y_test": y_test,
        "label_to_id": label_to_id,
        "id_to_label": id_to_label,
    }

    dataset_path = os.path.join(output_dir, "dataset.json")
    with open(dataset_path, "w", encoding="utf-8") as f:
        json.dump(dataset, f, ensure_ascii=False, indent=2)

    return dataset_path
Ở đây cố ý không dùng pandas để giữ mọi thứ nhẹ, phù hợp với yêu cầu trước đó.
4. Module huấn luyện có MLflow: ml_project/train_mlflow.py
Tiếp theo là phần training. Mục tiêu:
-
Đọc file
dataset.jsonsinh bởi bước dữ liệu. -
Vector hóa text (ở đây dùng TF-IDF cho đơn giản).
-
Train một model đơn giản (Logistic Regression).
-
Log toàn bộ params/metrics/artifacts vào MLflow.
-
Đăng ký model vào Model Registry và gắn stage Production nếu muốn.
# ml_project/train_mlflow.py

import json
import os
from typing import Dict, Any

import mlflow
import mlflow.sklearn
from mlflow.tracking import MlflowClient
from sklearn.feature_extraction.text import TfidfVectorizer
from sklearn.linear_model import LogisticRegression
from sklearn.metrics import accuracy_score, f1_score

from .config import MLFLOW_EXPERIMENT_NAME, MLFLOW_MODEL_NAME


def _load_dataset(dataset_path: str) -> Dict[str, Any]:
    with open(dataset_path, "r", encoding="utf-8") as f:
        data = json.load(f)
    return data


def train_with_mlflow(
    dataset_path: str,
    experiment_name: str = MLFLOW_EXPERIMENT_NAME,
    C: float = 1.0,
    max_iter: int = 200,
) -> str:
    """
    Huấn luyện model phân loại topic với TF-IDF + Logistic Regression,
    log toàn bộ vào MLflow và trả về run_id.
    """
    data = _load_dataset(dataset_path)
    X_train = data["X_train"]
    y_train = data["y_train"]
    X_test = data["X_test"]
    y_test = data["y_test"]
    id_to_label = {int(k): v for k, v in data["id_to_label"].items()}

    mlflow.set_experiment(experiment_name)

    vectorizer = TfidfVectorizer(max_features=10000)

    with mlflow.start_run() as run:
        mlflow.log_param("vectorizer", "TfidfVectorizer")
        mlflow.log_param("max_features", 10000)
        mlflow.log_param("model_type", "LogisticRegression")
        mlflow.log_param("C", C)
        mlflow.log_param("max_iter", max_iter)

        X_train_vec = vectorizer.fit_transform(X_train)
        X_test_vec = vectorizer.transform(X_test)

        model = LogisticRegression(C=C, max_iter=max_iter)
        model.fit(X_train_vec, y_train)

        y_pred = model.predict(X_test_vec)
        acc = accuracy_score(y_test, y_pred)
        f1 = f1_score(y_test, y_pred, average="macro")

        mlflow.log_metric("accuracy", acc)
        mlflow.log_metric("f1_macro", f1)

        # Log model dưới dạng chuẩn MLflow
        mlflow.sklearn.log_model(
            sk_model=model,
            artifact_path="model",
            registered_model_name=None,  # registry làm ở bước khác cho rõ ràng
        )

        # Log label mapping và vectorizer
        labels_path = os.path.join("artifacts", "id_to_label.json")
        os.makedirs("artifacts", exist_ok=True)
        with open(labels_path, "w", encoding="utf-8") as f:
            json.dump(id_to_label, f, ensure_ascii=False, indent=2)
        mlflow.log_artifact(labels_path, artifact_path="artifacts")

        run_id = run.info.run_id

    return run_id


def register_model_from_run(
    run_id: str,
    model_name: str = MLFLOW_MODEL_NAME,
    metric_name: str = "f1_macro",
) -> int:
    """
    Lấy model từ một run cụ thể, đăng ký vào Model Registry và chuyển sang stage Production.
    Trả về version của model vừa đăng ký.
    """
    client = MlflowClient()
    run = client.get_run(run_id)

    if metric_name not in run.data.metrics:
        raise ValueError(f"Metric {metric_name} không tồn tại trong run {run_id}")

    metric_value = run.data.metrics[metric_name]
    model_uri = f"runs:/{run_id}/model"

    mv = mlflow.register_model(model_uri=model_uri, name=model_name)

    client.set_model_version_tag(
        name=model_name,
        version=mv.version,
        key=metric_name,
        value=str(metric_value),
    )

    client.transition_model_version_stage(
        name=model_name,
        version=mv.version,
        stage="Production",
        archive_existing_versions=True,
    )

    return mv.version
5. Khởi chạy MLflow Tracking Server
Để Airflow và code ML cùng log vào một nơi, nên chạy MLflow server riêng (có thể local). Ví dụ đơn giản dùng SQLite làm backend:
cd arxiv_topic_pipeline

mlflow server \
  --backend-store-uri sqlite:///mlflow.db \
  --default-artifact-root ./mlruns \
  --host 0.0.0.0 \
  --port 5000
Sau đó thiết lập biến môi trường để mọi process (cả Airflow) đều log về server này:
export MLFLOW_TRACKING_URI="http://localhost:5000"6. Kết nối bằng Apache Airflow: DAG dags/arxiv_airflow_mlflow.py
Bây giờ đến phần chính: biến pipeline thành DAG. DAG này có ba bước tối thiểu:
-
Chuẩn bị dữ liệu: gọi
prepare_dataset, lưudataset.json, trả về path. -
Huấn luyện và log model: gọi
train_with_mlflow, lấyrun_id. -
Đăng ký model tốt nhất (ở đây đơn giản là run vừa train): gọi
register_model_from_run.
# dags/arxiv_airflow_mlflow.py

from datetime import datetime, timedelta

from airflow import DAG
from airflow.operators.python import PythonOperator


def airflow_prepare_dataset(**context):
    # Import bên trong để tránh lỗi khi Airflow parse DAG mà thiếu dependency
    from ml_project.data_pipeline import prepare_dataset

    dataset_path = prepare_dataset()
    return dataset_path  # XCom


def airflow_train_model(**context):
    from ml_project.train_mlflow import train_with_mlflow

    ti = context["ti"]
    dataset_path = ti.xcom_pull(task_ids="prepare_dataset")
    if not dataset_path:
        raise ValueError("Không lấy được dataset_path từ XCom")

    run_id = train_with_mlflow(dataset_path=dataset_path)
    return run_id


def airflow_register_model(**context):
    from ml_project.train_mlflow import register_model_from_run

    ti = context["ti"]
    run_id = ti.xcom_pull(task_ids="train_model")
    if not run_id:
        raise ValueError("Không lấy được run_id từ XCom")

    version = register_model_from_run(run_id=run_id)
    return f"registered_version:{version}"


default_args = {
    "owner": "mlops",
    "retries": 1,
    "retry_delay": timedelta(minutes=5),
}


with DAG(
    dag_id="arxiv_topic_classification_daily",
    description="Pipeline phân loại chủ đề bài báo arXiv với Airflow + MLflow",
    start_date=datetime(2025, 1, 1),
    schedule_interval="@daily",
    catchup=False,
    default_args=default_args,
    tags=["mlops", "arxiv"],
) as dag:

    prepare_dataset_task = PythonOperator(
        task_id="prepare_dataset",
        python_callable=airflow_prepare_dataset,
        provide_context=True,
    )

    train_model_task = PythonOperator(
        task_id="train_model",
        python_callable=airflow_train_model,
        provide_context=True,
    )

    register_model_task = PythonOperator(
        task_id="register_model",
        python_callable=airflow_register_model,
        provide_context=True,
    )

    prepare_dataset_task >> train_model_task >> register_model_task
Lưu ý:
-
Cần đảm bảo thư mục gốc
arxiv_topic_pipelinenằm trongPYTHONPATHcủa Airflow (hoặc càiml_projectthành một package bằngpip install -e .). -
Import bên trong hàm
airflow_*giúp Airflow parse DAG kể cả khi venv chưa cài đủ cho toàn bộ project, nhưng về thực tế nên đồng bộ môi trường.
7. Chạy Airflow và test pipeline
Với code DAG đã nằm trong thư mục dags/ mà Airflow đang sử dụng, các bước cơ bản:
-
Khởi tạo Airflow database (lần đầu):
airflow db init -
Tạo user:
airflow users create \ --username admin \ --firstname Admin \ --lastname User \ --role Admin \ --email admin@example.com \ --password admin -
Chạy webserver và scheduler (hai terminal khác nhau, cùng venv):
airflow webserver
airflow scheduler
Khi webserver chạy, có thể truy cập UI, bật DAG arxiv_topic_classification_daily sang trạng thái “on” rồi trigger một run thử. Nếu mọi thứ đúng:
-
Task
prepare_datasetsẽ sinh filedata/dataset.json. -
Task
train_modellog một run mới trong MLflow, metric, model. -
Task
register_modelđăng ký model vào Model Registry và chuyển sang stage Production.
Tại UI MLflow (http://localhost:5000), tab Experiments sẽ hiển thị tất cả run của pipeline; tab Models sẽ hiển thị các phiên bản model với stage tương ứng.
8. Các bước mở rộng hợp lý
Khi pipeline cơ bản đã chạy được, các bước mở rộng hợp lý bao gồm:
-
Tách riêng DAG scraping dữ liệu (từ arXiv API) và DAG training, kết nối qua storage (S 3/MinIO).
-
Thử nghiệm nhiều model khác nhau (Random Forest, XGBoost, LightGBM) và log tất cả vào cùng một experiment trong MLflow, sau đó để bước “chọn model tốt nhất” query MLflow để quyết định.
-
Thêm task validate data (kiểm tra class imbalance, outlier) trước khi train, để tránh train model trên dữ liệu bẩn.
-
Bổ sung notification (email/Slack) từ Airflow khi run fail hoặc khi có model mới được đẩy lên Production.
Những thay đổi này không làm thay đổi cốt lõi: Airflow lo orchestration và scheduling; MLflow lo tracking và quản lý model.
Cheat sheet
1. Apache Airflow – Cú pháp và tính năng hay dùng
Trong thực tế, khi viết DAG cho pipeline phân loại arXiv, thường chỉ xoay quanh vài khối xây dựng chính: DAG, Operator, dependency, XCom, schedule và retry.
- Khai báo DAG cơ bản bằng context manager
Thay vì tạo DAG() rồi gán từng task, cách thường dùng nhất là:
from datetime import datetime, timedelta
from airflow import DAG

default_args = {
    "owner": "mlops",
    "retries": 1,
    "retry_delay": timedelta(minutes=5),
}

with DAG(
    dag_id="arxiv_topic_classification_daily",
    description="Pipeline phân loại bài báo arXiv",
    start_date=datetime(2025, 1, 1),
    schedule_interval="@daily",
    catchup=False,
    default_args=default_args,
    tags=["mlops", "arxiv"],
) as dag:
    ...
Điểm cần nhớ:
-
start_date: mốc thời gian Airflow bắt đầu tính schedule. -
schedule_interval:@daily,@hourly, cron expression ("0 2 * * *"…). -
catchup=False: tránh việc Airflow tự chạy bù toàn bộ khoảng từstart_dateđến hiện tại.
- Định nghĩa task với
PythonOperator
Đối với pipeline ML, PythonOperator là operator hay dùng nhất, vì task chủ yếu là gọi hàm Python trong module dự án:
from airflow.operators.python import PythonOperator

def airflow_prepare_dataset(**context):
    from ml_project.data_pipeline import prepare_dataset
    dataset_path = prepare_dataset()
    return dataset_path

prepare_dataset_task = PythonOperator(
    task_id="prepare_dataset",
    python_callable=airflow_prepare_dataset,
    provide_context=True,
)
Lưu ý:
-
python_callablelà một hàm bình thường, có thể import module dự án bên trong. -
provide_context=Trueđể có thể nhận**contextvà truy cậpti,ds,execution_datenếu cần.
- Thiết lập dependency giữa các task
Cú pháp dễ nhớ nhất:
prepare_dataset_task >> train_model_task >> register_model_taskDạng này tương đương:
train_model_task.set_upstream(prepare_dataset_task)
register_model_task.set_upstream(train_model_task)- Truyền dữ liệu giữa các task qua XCom
Airflow cho phép task trả về giá trị và task khác đọc lại qua XCom:
-
Trong task A:
def airflow_prepare_dataset(**context): ... return dataset_path -
Trong task B:
def airflow_train_model(**context):
    ti = context["ti"]
    dataset_path = ti.xcom_pull(task_ids="prepare_dataset")
Quy tắc ngầm: return của python_callable sẽ được Airflow tự động đẩy vào XCom.
- Retry, timeout, SLA
Những thuộc tính hay chỉnh:
-
retriesvàretry_delaytrongdefault_args. -
execution_timeoutở từng task nếu muốn giới hạn thời gian chạy. -
slađể định nghĩa deadline cho task (nếu trễ sẽ xuất hiện cảnh báo, dùng cho batch quan trọng).
2. MLflow – Cú pháp và tính năng hay dùng
Trong project phân loại arXiv, MLflow được dùng chủ yếu ở 3 lớp: Tracking (log run), Models (đóng gói model) và Model Registry (quản lý version + stage).
- Thiết lập experiment và start run
Trước khi log, nên set experiment rõ ràng:
import mlflow

mlflow.set_experiment("arxiv-topic-classification")

with mlflow.start_run() as run:
    ...
    run_id = run.info.run_id
Nếu chưa tồn tại, experiment sẽ được tạo mới; nếu đã tồn tại, run mới sẽ ghi tiếp vào đó.
- Log tham số, metric, artifact
Trong từng run:
mlflow.log_param("model_type", "LogisticRegression")
mlflow.log_param("C", 1.0)
mlflow.log_param("max_iter", 200)

mlflow.log_metric("accuracy", acc)
mlflow.log_metric("f1_macro", f1)

mlflow.log_artifact("artifacts/id_to_label.json", artifact_path="artifacts")
Một số thói quen tốt:
-
Luôn log các hyper-parameter quan trọng (C, max_features, learning_rate…).
-
Chọn 1–2 metric “chính” dùng để so sánh và chọn model (ở đây là
f1_macro). -
Log thêm artifacts phân tích như confusion matrix, label mapping, file cấu hình.
- Log model theo chuẩn MLflow
Cho sklearn:
import mlflow.sklearn

mlflow.sklearn.log_model(
    sk_model=model,
    artifact_path="model",
    registered_model_name=None,  # registry sẽ làm riêng
)
Sau này có thể load lại bằng:
loaded_model = mlflow.sklearn.load_model("runs:/<run_id>/model")- Dùng
MlflowClientđể quản lý Model Registry
Khi run đã log xong:
from mlflow.tracking import MlflowClient

client = MlflowClient()
model_uri = f"runs:/{run_id}/model"

mv = mlflow.register_model(
    model_uri=model_uri,
    name="arxiv_topic_classifier",
)

client.set_model_version_tag(
    name="arxiv_topic_classifier",
    version=mv.version,
    key="f1_macro",
    value=str(metric_value),
)

client.transition_model_version_stage(
    name="arxiv_topic_classifier",
    version=mv.version,
    stage="Production",
    archive_existing_versions=True,
)
Điểm cần nhớ:
-
register_modelbiến một artifact từ run cụ thể thành một model version trong registry. -
set_model_version_taggán thêm metadata cho version (ví dụ F 1), giúp tra cứu sau này. -
transition_model_version_stageđổi stage giữaNone/Staging/Production/Archived.
- Các biến môi trường quan trọng
Để Airflow và code ML cùng log về một MLflow server chung, cần set:
export MLFLOW_TRACKING_URI="http://localhost:5000"Nếu dùng backend khác (Postgres, S 3…), cấu hình sẽ đi qua --backend-store-uri và --default-artifact-root khi khởi chạy mlflow server.
3. Liên hệ lại với pipeline phân loại arXiv
Trong toàn bộ dự án:
-
Airflow được dùng với các khối syntax: định nghĩa DAG bằng context manager,
PythonOperatorđể gọi hàmprepare_dataset,train_with_mlflow,register_model_from_run, dependency bằng>>, XCom để truyềndataset_pathvàrun_id. -
MLflow được dùng để bao quanh toàn bộ phần huấn luyện:
set_experimentcho pipeline phân loại arXiv,start_runcho từng lần train, log params/metrics/artifacts, log model theo chuẩn sklearn, và cuối cùng đăng ký model, gán stage Production trong Model Registry.
Khi quen với những cú pháp cốt lõi này, việc mở rộng pipeline (thêm DAG scraping riêng, thêm nhiều model candidate, thêm bước chọn model tốt nhất dựa trên query MLflow) về cơ bản chỉ là lặp lại cùng những pattern đã dùng, thay vì phải phát minh lại cách ghép script và quản lý model từ đầu.